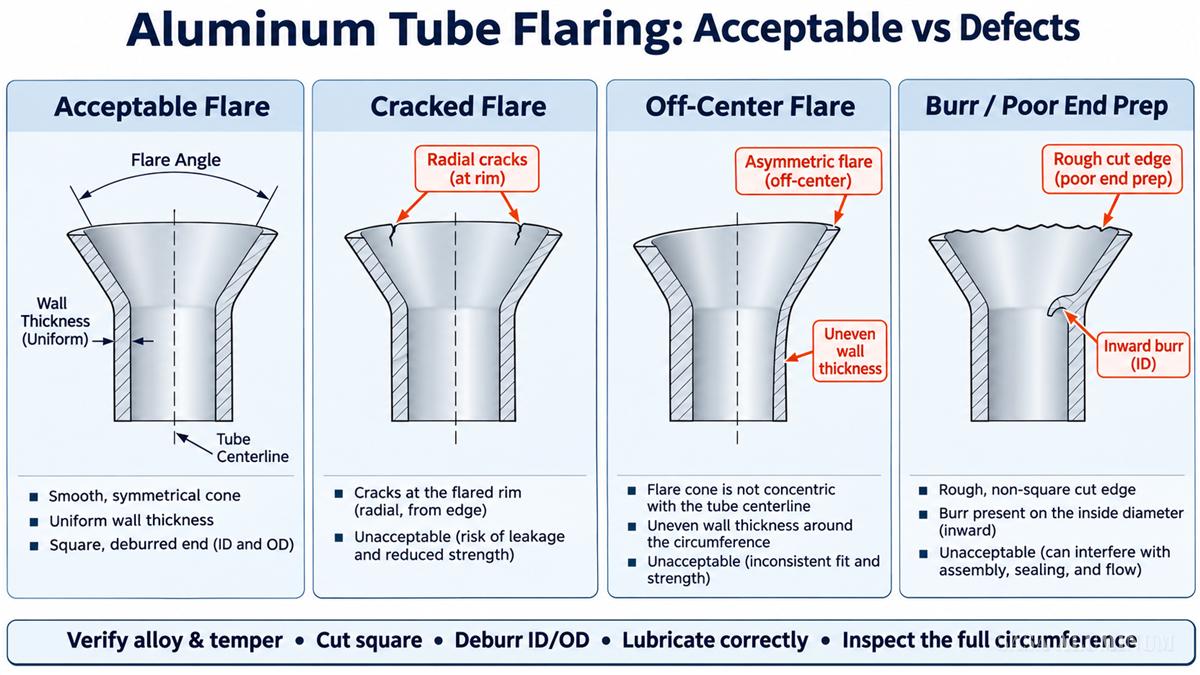
Why Aluminum Tube Flares Crack
| Cause | What happens | Control direction |
|---|---|---|
| Alloy/temper too hard for the expansion | Insufficient ductility at the flare rim | Verify the product form and temper; qualify the forming process |
| Burr, notch or scratch at the end | Local stress concentration starts a radial crack | Cut square, deburr ID/OD and reject damaged ends |
| Too much expansion in one step | High local thinning and strain | Use the approved flare geometry and progressive forming when required |
| Wrong tool or poor alignment | Off-center cone and uneven wall | Match tool angle/diameter and align the tube centerline |
| Poor lubrication or contaminated tooling | Galling, scoring and non-uniform flow | Use a compatible lubricant and clean, smooth tooling |
Alloy and Temper Come First
Aluminum alloys do not have the same formability. Annealed or softer tempers are generally easier to expand than high-strength heat-treated tempers, but the allowable flare depends on alloy, wall, diameter, manufacturing route and required angle. Do not locally heat-treat or anneal a production part unless the engineering specification and process qualification explicitly allow it.
Prepare the Tube End
- Cut the tube end square to the centerline.
- Remove internal and external burrs without creating a sharp chamfer or reducing the wall below drawing limits.
- Clean chips, oxide debris and lubricant contamination from the forming zone.
- Inspect for longitudinal scratches, dents, seams or pitting that could initiate cracks.
- Confirm the starting OD, ID/wall, ovality and end condition before forming.
Tool Alignment and Forming Sequence
The tool must match the specified flare type and angle. Clamp the tube without crushing it, align the tube and cone, apply compatible lubricant where the approved process requires it, and form with smooth controlled travel. For large expansion ratios or difficult tempers, a multi-stage process may be necessary. The required sequence should be proven by trial and inspection before production.
How to Inspect a Finished Flare
| Check | Acceptable condition | Reject or investigate |
|---|---|---|
| Rim | Continuous and smooth around the circumference | Radial cracks, splits or sharp notches |
| Concentricity | Flare centered on the tube axis | One-sided or tilted flare |
| Surface | Smooth forming marks within the agreed limit | Galling, deep scoring or folds |
| Wall | Uniform transition without local collapse | Severe thinning, wrinkles or buckling |
| Fit | Seats with the specified mating component | Rocking, gap or interference caused by burrs |
RFQ Information for Flareable Aluminum Tube
- Alloy, temper and governing tube specification
- OD, ID/wall, cut length and tolerances
- Flare type, included angle and final dimensions
- Required expansion ratio or forming sample
- Surface and end-condition limits
- Inspection method, sampling and acceptance criteria
- Joining/service conditions and required documentation
Frequently Asked Questions
Can every aluminum tube be flared?
No. Formability depends on alloy, temper, tube route, geometry and the required expansion. A process trial is appropriate when the combination is not already qualified.
Does heating the end prevent cracking?
Uncontrolled heating can change temper, strength, corrosion performance and dimensions. Use heat only when an approved engineering and process specification defines it.
Can a cracked flare be repaired?
A cracked flare is normally removed and remade using the approved process; it should not be hidden by polishing. Critical applications require the responsible engineering authority’s disposition.
Send the tube specification and flare drawing so alloy, temper, wall and end-condition requirements can be reviewed together.
Post time: Nov-03-2026